1. Download the latest IBM PC DOS file (for 1.00 and 1.10) from Hampa Hug's Latest PCE Downloads page:
pce-20220115-fa52687a-ibm-pc-pcdos-1.00.zip;
which also contains these IBM PC DOS 1.10 ROM files in its /data/rom folder:
ibm-pc-1982-10-27.rom; 8,192 bytes, and ibm-basic-1.10.rom; 32,768 bytes.
If you have any problems with this link, check Hampa's
Latest Downloads Directory here for a directory later than January 15, 2022, then download the
"pce-<whatever date-number it has>-ibm-pc-pcdos-1.00.zip" file from there.
The reason an IBM PC or any code attempting to emulate an IBM PC DOS 1.10 computer must use or be based upon the original IBM PC version 1.10 (October 10, 1982) BIOS chip in order to create 320 KiB diskettes is that "BIOS modifications permit DOS [1.10] to recognize whether a disk is single or double sided."[1] So without BIOS code from that chip, any PC or PC emulator may have unexpected results when attempting to FORMAT a "double-sided" 320 KiB image file.[2]
2. Extract all the files and folders from pce-20220115-fa52687a-ibm-pc-pcdos-1.00.zip, using the Sub-Folder Names in that Zip file to a
new folder easily accessible. For more details and recommendations on doing so, see our Introduction to PCE page here.
If you haven't used PCE before, you may wish to read and run through the examples there yourself using the pre-configured files in the Zip download for IBM PC DOS 1.00, by
executing the run-cga.bat file that comes with it before proceeding here.
3. Once you have the PCE files and folders extracted into what I'll refer to as the main PCE folder, go into its /data/images sub-folder and copy the file pc-dos-1.10.psi into the main PCE folder; we'll use this file to boot the emulator into IBM PC DOS 1.10 below.
4. I've made things easier by editing copies of both the run-cga.bat file and the PCE Configuration file (pce-5150.cfg), renaming them: run-110-cga.bat.txt (it must be a text file for some to download it, but this also makes it easier for you to check it) and pce-110-5150.cfg, and providing them as Make320Kimage.zip along with a "use110psi.txt" to download. Do so now, and copy those files from the Zip into your main PCE folder. If you compare the *.cfg configuration files, you'll see that I commented out (put a # character in front of) lines 9 and 10, and un-commented lines 15 and 16 to use the IBM PC 1.10 ROM files. Look at my run-110-cga.bat.txt file, and you'll see I simply: changed the *.cfg file name and deleted the "-r" at the end to prevent the emulator from running immediately.
5. Remove the ".txt" extension from the batch file, and run it. Focus on the larger black screen, and it will soon stop running with only the "Monitor" prompt of a dash (-) on the last line. At this point the emulator has not yet boot up PC DOS 1.00; though it is ready to.
6. Temporarily swap the diskette image files in Memory by ENTERING the following command at that dash (-) prompt: < use110psi.txt (Note: That is a LESS THAN character a space and the name of the 3rd file from the Zip file). Or, you can ENTER the lines from that file yourself, first: m eject 0 and then: m insert pc-dos-1.10.psi. You should see the following on the screen if you use the file:
- < use110psi.txt
redirecting from "use110psi.txt"
m eject 0
ejecting disk 0
m insert pc-dos-1.10.psi
inserting disk 0 (pc-dos-1.10.psi)
- |
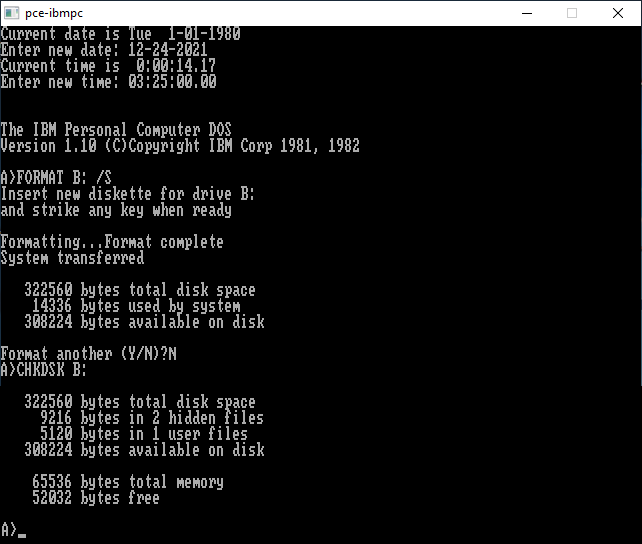
7. PCE is now ready to boot IMB PC DOS 1.10. Simply ENTER the letter g (short for go) at the Monitor's dash (-) prompt. It will reset, beep and boot into PC DOS 1.10 in the "pce-ibmpc" emulator window (see photo below). Set date (using [mm-dd-yyyy]; for 1980-1999, only yy is necessary) and time (using [hh:mm:ss.xx]; the ".xx" is optional), or simply press the ENTER key twice, and verify you are running IBM PC DOS 1.10.
8. At the prompt, enter the following command (attempting to SYS a diskette after a simple FORMAT will not work[3]):
FORMAT B: /S
When prompted to Insert new diskette for drive B:, press the ENTER key, and the following should appear (it will actually take some time to format the PCE image file, since FORMAT.COM must
add 320 KiB of F6 bytes and then test for any "defective tracks"):
You can see that the size of the diskette is at least 322,560 bytes; the difference of 327,680 - 322,560 = 5,120 is due to the Boot Sector (512), two FATs (1024) and the Directory (7 sectors) which DOS 1.10 does not account for. Using the CHKDSK B: command reveals there are "2 hidden files" and "1 user files" which DIR B: (see below) shows is COMMAND.COM.
Why the difference of (5120 - 4959) bytes? Because CHKDSK shows allocated space using clusters (of full sectors), not the actual size of a file. That's why any file that is not an exact multiple in size as the Cluster Size (512 bytes for DOS 1.00/1.10 on a Single-Sided diskette, but 1024 bytes for a DOS 1.10 Double-Sided diskette), will have Slack Space in the last cluster. Executing the DEBUG commands shown below, reveals the Boot Sector of this diskette now has "03 01" instead of "08 00" (at offsets 0x03 and 0x04):
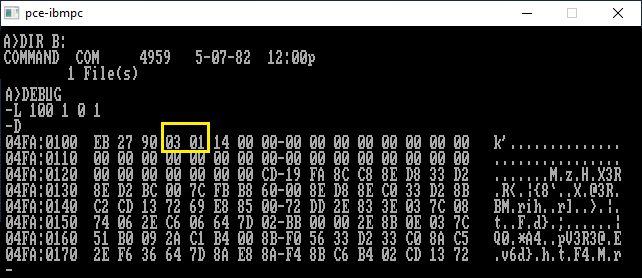
Leave the DEBUG prompt by entering: q (for quit).
Important Note: You must either: 1) Properly shut down the PC Emulator, or: 2) Perform a commit operation on the image file, before PCE will write any changes from Memory to its
files! To commit the FORMAT changes from Memory to your B: drive image file, press and then release the <ESC> key, then press the m key; which will drop you back into
the black Monitor screen, and at its dash (-) prompt, ENTER:
m disk.commit 1 (the "1" meaning the B: drive), and the PCE Monitor will reply back with: "commiting disk 1".
You should now see that the fd1.psi file has grown in size from only 9.85 KB (10,096 bytes) to 31.4 KB (32,216 bytes); the increase due to having the Boot Sector, IBMBIO.COM, IBMDOS.COM and COMMAND.COM written to it.
9. In order to obtain a full-sized actual 320 KiB image file from that *.psi file, you'll need to convert it by doing:
1) Copy the fd1.psi file from the main PCE folder into its /bin folder.
2) If you know how to open a Command Prompt window to that folder, do so, and ENTER the line: psi fd1.psi fd1.img (and fd1.img will be 320 KiB in size, and ready to boot in other emulators).
3) You could make a batch file by entering the following lines in a text file, then changing its extension to .bat:
echo off
echo
echo   This batch file will create a full-sized image
echo   file from any fd1.psi file in this folder.
echo
echo  If you do not wish to do so, close this window!
echo
pause
echo
psi fd1.psi fd1.img
exit
and running that batch program in the /bin folder.
If you wish to read more about using PCE below, ENTER g at the Monitor prompt, otherwise, ENTER q (to quit).
For the examples below, ENTER: COPY DEBUG.COM B: (in fact, you may wish to copy all of the .COM files to your B: drive; fd1.psi file, using: COPY *.COM B:). Without thinking about it, after I had already copied DEBUG.COM to my B: drive, I told it to copy all *.COM files there. Well, it happily carried out the copying of every .COM file, in the order found on the A: drive, and never informed me that both COMMAND.COM and DEBUG.COM already existed on the B: drive.
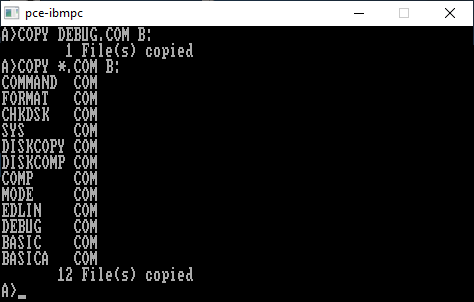
Surprise: COPY did not erase or change the location of either file. I wasn't 100% positive if COPY actually wrote any bytes to where it found COMMAND.COM and DEBUG.COM, but I do know for sure: If there
had been any differences inside those target files; not in their names or sizes, that COPY would have overwritten at least those bytes! (I tested this by using a disk editor to alter some bytes inside a number of the same files I'd copied
to the B: drive, keeping them in the same locations with the same sizes, and COPY did overwrite those differing bytes. It's highly likely that COPY simply overwrites every byte of any existing file; without moving files of the same size,
but a dynamic debugging analysis would need to be performed to confirm that.)
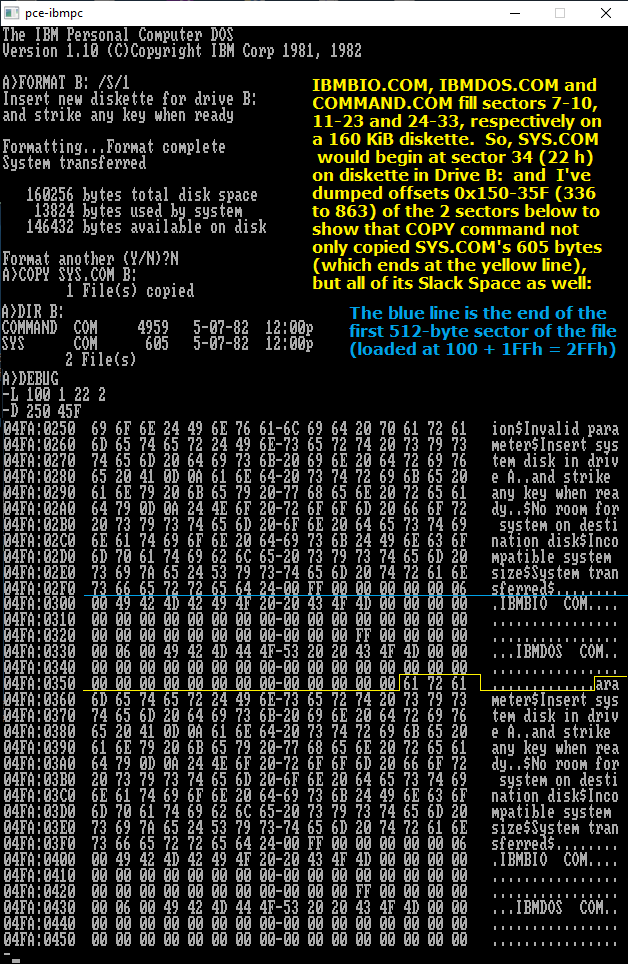
In one case, I simply changed some bytes in the Slack Space of a file and this may be a big surprise for some of you: The COPY command not only copies a file's contents, but every byte of its Slack Space too! This means the COPY
command copies all the bytes ALLOCATED to a file; all of its cluster(s), not simply its byte size contents![4]
In order to boot DOS from this new 320 KiB PCE file, first eject the B: drive; which will also commit the changes to it, using:
<ESC> key, m key and then in the
Monitor screen: m eject 1
and it will reply back with: "disk 1: writing back psi image to fd1.psi"
Now ENTER: m eject 0 and then: m insert fd1.psi
and
PCE will reply back with: "inserting disk 0 (fd1.psi)"
By swapping the diskette images (as we did above) without shutting down PCE, you can RESET the emulator (like a real PC) and it will boot up with the fd1.psi image in the A: drive if you do this now: At the Monitor prompt,
ENTER: m emu.reset and then: g
You can confirm this is the 320 KiB image by entering: CHKDSK A: (and note its size).
Entering the commands, DEBUG, L 100 0 3 2 and then D (however many times you want), will show you the Directory of your A: drive image as it would
appear on the diskette. If you copied DEBUG.COM first, it should look like this:
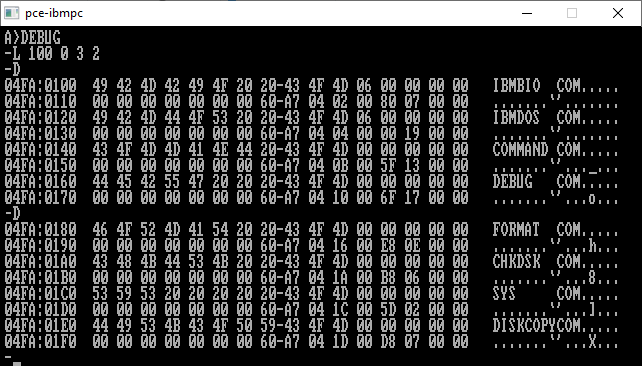
Leave the DEBUG prompt by entering: q (for quit).
Shut down the PC Emulator whenever you wish by pressing the <ESC> and then m keys, and entering q (quit) in the Monitor screen.
1[Return to Text] The quote is found in the GREEN box next to "1982, May" of Wikipedia's Timeline of DOS page, beginning with "IBM releases an upgraded PC with IBM PC DOS 1.1..." At least that's what was said about the original hardware.
2[Return to
Text] I've tried doing so under Bochs with "floppyb:" set to "320k"
and not protected ("write_protected=0"), and it fails every time, with an error message about the A:
drive being write-protected; which it was (if I don't intend to write to it, I protect it), but it should have tried writing to only the B: drive! Checking
the image file, I found that it had (as hoped) created the correct Boot (Loading) Sector, but the rest of the image file contained F6
bytes in only 1 sector for every 8; meaning it had never written to 7/8-ths of the image, and never transferred any system files
to it!
However, please note: Bochs is perfectly capable of booting-up a 320 KiB formatted image file; so has no problems reading one! The
Bochs debugger is what I used to examine each step of the boot process the first time. The "Monitor" built into PCE can also be used
to step through the boot up process.
3[Return to Text] First, it should be obvious that DISKCOPY cannot be used to create a 320 KiB diskette from the 160 KiB PC DOS 1.10 distribution diskette, since it will simply make another 160 KiB diskette. And for those already familiar with much later versions of SYS, it may be difficult to understand at first, but the only reason they made SYS originally was to update existing versions of IBMBIO.COM and IBMDOS.COM (when earlier versions had the same file sizes; or as pointed out here, the exact file space had already been allocated on a diskette; see our comments about SYS.COM on a Pre-Release version of the 1.00 diskette). Here's the fine print as to why you could not use the SYS command in the same way later DOS versions were able to: "The diskette in the specified drive must already be formatted by a FORMAT d:/S command to contain a copy of DOS. If you did not format the diskette with the /S option, the system cannot be transferred because the specific diskette locations required for the system files have not been allocated. Note: SYS lets you transfer a copy of DOS to an application program diskette designed to use DOS, but sold without it. In this case, the specific diskette locations required for the DOS files have already been allocated, although the DOS files are not actually present. The SYS command will transfer the files to the allocated space." Disk Operating System, Second Edition (May, 1982), Version 1.10, © Copyright International Business Machines Corporation 1981, page 3-61. Also: "FORMAT writes on every sector of your diskette, sets up the Directory and File Allocation Table, and puts the boot record program at the beginning of your diskette. FORMAT also creates a copy of DOS on a new diskette if you specify it in your command." Ibid., Disk Operating System, page 1-7. This IBM reference manual is available as an 8 MB PDF file from: Bit Savers, DOS 1.1, May 1982, or a full color 19 MB file version from: Minus Zero Degrees, DOS Version 1.1 Reference.
4[Return to Text] I verified this for both IBM PC DOS 1.00 (e.g, by copying DATE.COM and TIME.COM to a second diskette image, and noting that all of the Slack Space which I wrote about previously appears at the end of their copies) and IBM PC DOS 1.10 (e.g. by copying SYS.COM; which has only 605 bytes of its own, but all of the original Slack Space can clearly be seen in the 2nd sector of its copy into another 160 KiB diskette image):
First Published: December 25, 2021 (2021.12.25).
Updated: December 26, 2021 (2021.12.26); added another photo and Last Step. December 27, 2021 (2021.12.27); many clarifications, more footnotes.
December 28, 2021 (2021.12.28); more clarifications, paragraph & footnote on COPY command copying clusters; not bytes.
Last Update: January 17, 2022 (2022.01.17); Revised most of the page for the latest PCE update.
You can reply to us here.
![]() IBM PC DOS 1.10 Index
IBM PC DOS 1.10 Index
![]() MBR
and Boot Records Index
MBR
and Boot Records Index![]() The Starman's Realm Index
The Starman's Realm Index