 Or, if this shortcut icon is on your Desktop, simply RIGHT-click on it and choose "Properties" (all the way at the bottom of the pop-up menu), then in the "Shortcut" TAB of Properties, click the "Open File Location" button: | 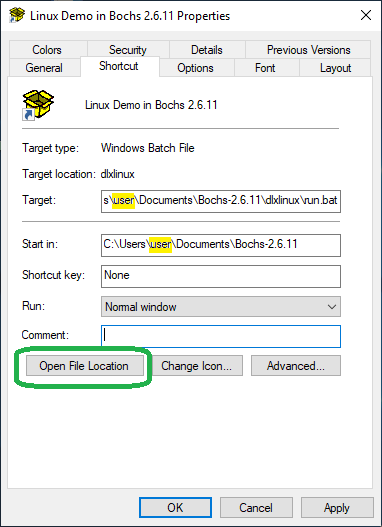 |
How to DEBUG System Code
using The Bochs Emulator
on a
Windows™ PC
If you need any help in setting up the Bochs Debugger, please email us.
Executing The Bochs Debugger
First, navigate to your "C:\Users\<your user name>\Documents\Bochs-2.6.11\dlxlinux\" folder (or wherever you installed Bochs); you can easily get there from the Windows Programs Menu under "Bochs 2.6.11" and then clicking on the "Bochs 2.6.11 Folder" choice.
Or, if this shortcut icon is on your Desktop, simply RIGHT-click on it and choose "Properties" (all the way at the bottom of the pop-up menu), then in the "Shortcut" TAB of Properties, click the "Open File Location" button: | |
Now make a copy of the dlxlinux folder's run.bat file in the same folder and rename it debug.bat. Edit that new file (use NOTEPAD or NotePad++) by changing the line "..\bochs -q -f bochsrc.bxrc" to: "..\bochsdbg -q -f bochsrc.bxrc" so it will execute the bochsdbg.exe program instead. Now run debug.bat.
The Bochs "Display" window will remain empty at this time, but you will see the following in the Bochs "Console" as it always pauses (technically, it's called a BREAK) at the first instruction of its own BIOS code whenever running bochsdbg.exe. Note that the same exact binary code (for this assembly instruction) can be found in virtually every PC's BIOS chip (well, until UEFI boot code on 64-bit machines):
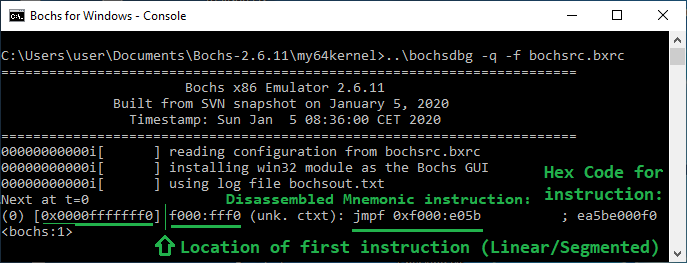
NOTE: In order to pause the execution of the DLX Linux image file (or your own boot code) at its very first assembly instruction (as shown in the picture below), you need to set a "linear breakpoint" (lb) in Memory at the linear location of 7c00 (Enter: lb 0x7c00); which is where the BIOS loads the Master Boot Record from Sector 0 of the first hard disk, or the first boot instruction from a CDROM/DVD or USB drive.
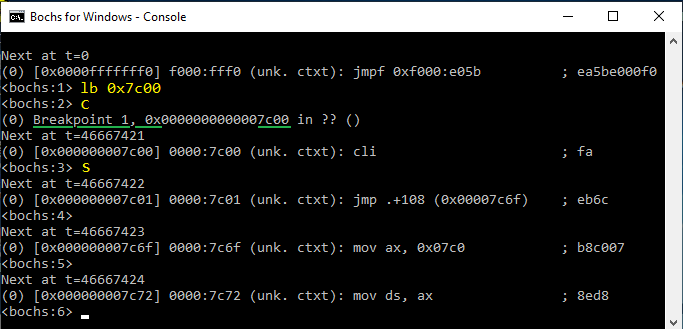
After entering the appropriate commands ("lb 0x7c00" and "c" to continue), the Bochs Debugger stops just before executing the first instruction of the DLX Linux image file. Following that we entered an "s" command to begin single-stepping through the code. (Note: All subsequent presses of the ENTER key will do the same thing as the previous command that was entered, so you only need to ENTER the 's' command one time, then simply press the ENTER key each time after that to keep executing a single Assembly instruction each time.) Here we executed two more instructions; arriving at Linear Memory Location 0x7c72:
Commands which can be used in both the Console and GUI Debuggers can be found in the documentation (see 8.14. Using Bochs internal debugger; you must replace %USERNAME% in the URL box of your web browser with your own username) which comes with the Bochs download. To get you started, we've highlighted some of the most important commands here (including one of the most important commands still left UN-documented: The p or proceed command!):
| c | Continue executing | |
| s [count] | (Step): execute count instructions; default is 1. | |
| q | Quit debugger and execution. | |
| Ctrl-C | stop execution, and return to command line prompt | |
| lb addr | Set a linear address instruction breakpoint | |
| info break | Display state of all current breakpoints | |
| bpe n | Enable a breakpoint | |
| bpd n | Disable a breakpoint | |
| del n | Delete a breakpoint | |
| p | Proceed (or "Step-Over"[1]) very useful for quickly executing subroutines and especially BIOS Interrupts! |
|
| modebp | Breaks execution at a mode change; that is, whenever the code switches to "real" (16-bit), "protected" (16- or 32-bit) or "long" (64-bit) modes, so could be very useful when examining OS Boot and loader code![2] |
The Bochs (GUI) Enhanced Debugger
In order to use the GUI form of the Bochs Debugger, first make a COPY of the bochsrc.bxrc file in the "\dlxlinux\" folder and change its name to GUIdebug.bxrc. Now open that new file in NOTEPAD (right-clicking on this file might give you an "Edit" choice), and search for these two lines inside the file:
#display_library: x
# other choices: win32 sdl wx carbon amigaos beos macintosh nogui rfb term svga
NOTE: Any line that begins with a #
symbol is inactive and taken only as a comment.
Then underneath those two commented lines, add this required un-commented line:
display_library: win32, options="gui_debug"
(The quote marks must be included.) Now make a COPY of the debug.bat file, change its name to GUIdebug.bat and edit that file
by changing the file name bochsrc.bxrc inside it to: GUIdebug.bxrc. Now when you run GUIdebug.bat, the Enhanced (Color)
Debugger should appear!
This next view shows the "Bochs Enhanced Debugger" about to step through the DLX Linux's LILO Master Boot Record code (located on the first sector of a PC's hard disk; or in this case, in the DLX Linux image file running under Bochs):
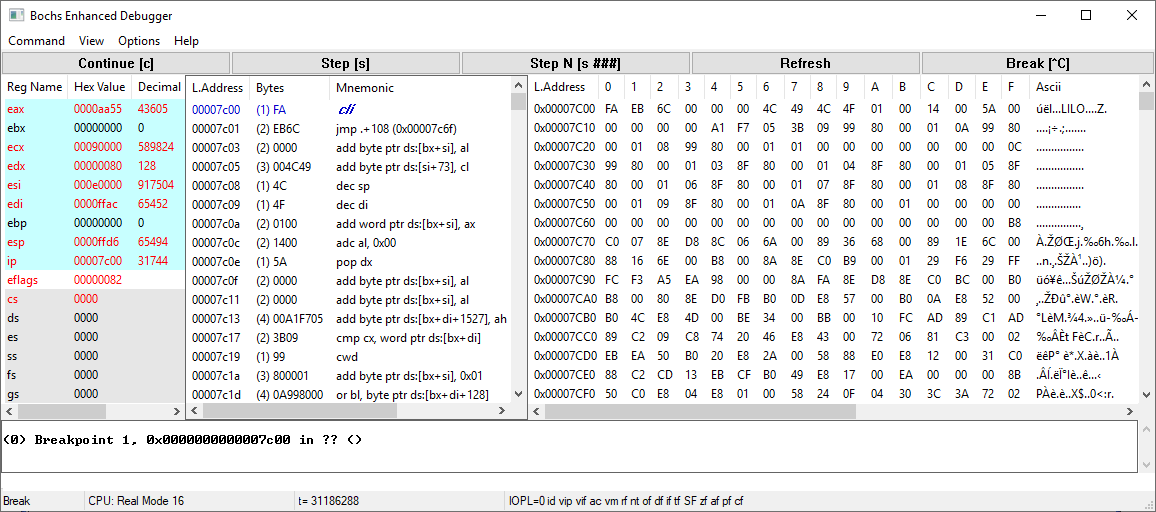
PLEASE NOTE: The author is well-aware of the fact that resizing this GUI Debugger "window" can be a real pain to work with, since each column and section inside the window must be re-sized separately, and changing the size of the whole window may affect each of the column sizes! We'll just have to live with that; unless you could possibly help develop a better display?! There's also a little quirk when stepping and especially 'proceeding' through the code, that sometimes the next line to be executed may be further down below the lines being displayed.
When you add other operating system folders under your Bochs install, we'd advise you to make copies of the fully commented sample bochsrc.bxrc file (which is found here: "C:\...\Bochs-2.6.11\bochsrc-sample.txt"), and rename each copy
as appropriate for the OS or project you're working with/on.
[ Note: If you setup the environment variable "$BXSHARE"
as being equal to the path where Bochs is installed, and use that variable in your configuration file, then you could setup image file folders anywhere
else on your PC; not just under the Bochs install directory. If you're using the install folder we recommended for version 2.6.11, you would open a Command Line
prompt and ENTER:
set $BXSHARE="C:\Users\<your user name>\Documents\Bochs-2.6.11\"
(Note: The quote marks are required here, and do not put any spaces before or after the '=' sign!) Then inside your .bat and configuration files in
those other folders, you could use "$BXSHARE" instead of writing out the path to where the Bochs executables are located, or using '..\'. For example:
"romimage: file=$BXSHARE/BIOS-bochs-latest" If you do not do this, then be sure to correct any line in the copies of the 'bochsrc-sample.txt'
file that use the environment variable '$BXSHARE/'. ]
You can also use the BOCHS (GUI) Debugger on the Windows 7/8/10 MBR code; see our Windows 7 MBR Pathways for step-by-step comments on the execution of each instruction.
| Setting Up a New OS under Bochs |
First, you need to understand that just like any hardware PC, for which it would be highly unlikely that moving its disk drive into a completely different type of PC would result in its OS booting-up inside that PC, so too, the chances would very small that making an image file of that PC's disk drive would result in a Bootable OS under Bochs, since Bochs also uses 'drivers' that are specific to its own emulated hardware BIOS code. However, if we go back in time and use an image file of an operating system whose only user interface was a command line, on a black screen, with very few peripherals, you'll find image files of some early DOS versions will run quite nicely under Bochs without any changes. Here at the Starman's Realm, we not only tested almost every possible DOS available, but also took the time to install and run at least Windows 95, 98SE and even XP under Bochs. [Note: For XP, it took all weekend (we had to leave the PC running most of two days and all night long), since its emulation speed is so slow compared to real hardware!] What about the Windows 7 MBR code? Well, if that's all you want to test, you can easily copy the CODE section (skipping the Partition Table) from the first sector of any Windows 7 OS boot drive into the first 446 bytes of some old DOS or early Windows HDD image that runs under Bochs, and it will boot-up into that OS. Like all other PC MBR code, it runs in Real Mode, and needs no special 'drivers' nor expects a specific OS to be installed on its HDD. [Note: If you attempt to do this with the DLX Linux image file that comes with Bochs, the Win 7, or any other DOS or Windows, MBR code will fail to boot it, because the Linux file system (ext2 in this case) does not require there be any VBR code in the first sector of its partition. It's possible for Linux to have boot code there, but Linux doesn't require it, since most installs place its Boot Loader/Manager at the beginning of an HDD. If you 'dual-boot' a Linux OS on a Windows PC, you can often ask a Linux install to put the Boot Loader into the Partition; which then gives you the option to revert back to a Windows MBR and Boot Manager and be able to boot up Linux from its Manager.] (NOTE: You can use the free HxD Disk Editor to copy the Win 7 MBR code; we've written a tutorial for doing just that here). As a first step, before using the bximage program that comes with Bochs, you can simply copy the hd10meg.img file in the Bochs dlxlinux folder to a new folder and rename it to something like dos10meg.img, then install some DOS in that 10 MiB file; for which you can then use the same Bochsrc.bxrc configuration file (with a few modifications). |
1[Return to Text] Although most debuggers use the term "Step-Over," grammatically that's a misnomer and may confuse some, since it does not simply step over the next assembly instruction but rather proceeds to execute that instruction plus EVERY instruction in every subroutine and function which that line of code leads to; and only then does execution stop at the next line of code! Note: Without this command, you would need to set a breakpoint at the following line of code after every BIOS Interrupt instruction you encounter (or any subroutines you wish to avoid stepping into) and then use the "c" command to execute until it breaks there.
2[Return to
Text] We recommend gaining some insight into the various CPU operating modes by reading the following (and the article links at Wikipedia):
Real mode ("Addresses in real mode always correspond to real
locations in memory." And are "characterized by a 20-bit segmented memory address space" which give us exactly 1 MiB of addressable memory
"and unlimited direct software access to all addressable memory, I/O addresses and peripheral hardware"),
Protected mode (This mode "allows system software to use features
such as virtual memory" and paging. It's also what first made multitasking possible on our Personal computers! It "may only be entered after the
system software sets up [a] descriptor table and enables the Protection Enable bit [not to be confused with PE, Portable Executable, software] in control
register 0."), and
Long mode (When the CPU actually has access to "64-bit instructions
and registers." A 64-bit CPU "acts identically as an IA-32 processor when running in real mode or protected mode." "A bit in the CPUID
extended attributes field informs programs in real or protected modes if the processor can go to long mode, which allows a program to
detect" a 64-bit CPU.)
Note: UEFI (Unified Extensible Firmware Interface) code (which has replaced the old BIOS code on many PC's and other computers), provided it's not
set to a "Legacy" option, runs (possibly briefly in 32-bit Protected mode but then) only in 64-bit Long mode; as do the operating systems on such
machines! So how can a Long mode OS run 32-bit code? By emulating the code: Such as Microsoft's "WoW64" subsystem built into the Windows 10 OS. [Return to Text]
Date Page Added: May 16, 2012 (16.05.2012) and revised: April 12, 2021 (12.04.2021).
Updated: May 20, 2013 (20.05.2013); May 25, 2013 (25.05.2013); May 29, 2013 (29.05.2013); July 15, 2013 (15.07.2013); April 13, 2021 (13.04.2021).
Last Updated: April 19, 2021 (19.04.2021).
You can write to me using this:
online reply form.
(It opens in a new window.)
![]() The Starman's x86 ASSEMBLY Pages
The Starman's x86 ASSEMBLY Pages
![]() The Starman's Realm Index Page
The Starman's Realm Index Page