Text or lines in Blue, Yellow, or Violet are notes; NOT part of the original output ).
A Tutorial in x86 Assembly Language:
An Examination
of the
EICAR Standard AV Test Program
Including
A step-by-step Analysis of its Operation
using
Microsoft's DEBUG
Program
The EICAR (European Institute for Computer Anti-Virus Research ) Standard AV Test Program has two slightly different forms (designated as eicar68.com and eicar70.com. The digits signify how many bytes are in each file). The larger file is often created when a text editor places the cursor on a newline before saving it (MS-DOS's EDIT.COM in text mode does this); which adds the hexadecimal bytes 0D and 0A (a carriage return and linefeed ) to the end of the file. This does not affect the program's operation in any way; it functions the same no matter how many extra bytes are place at the end of its file (unless your OS refuses to execute a .COM file that exceeds the old 64 KiB memory limit). From this point on we'll refer to any of its formats (68, 70 or whatever length) as simply EICAR.COM.
There appears to have been three main requirements
for this program
The reason for this last requirement was to make it possible for the program to be created using only a text editor; the exclusion of spaces leaves no doubt about the total number of bytes. Another benefit of limiting the program to ASCII characters only is the ease of transmission by any email client/server.
Requirements 3 and 4, meant that the programmer could only use the HEX bytes 21 - 60 and 7B - 7E. But the only way a DOS program can send characters to the display screen is through an "interrupt function," and all x86 interrupts must begin with the hex byte, CD (decimal = 205). This obviously exceeds the range of the standard ASCII characters ( 0 to 127). So how did they do it? That's one of the things you'll learn by going through this tutorial.
|
Most programmers today rarely if ever deal with the kind of details presented in this tutorial. We wrote this page so students and even the average PC user could appreciate both the complexity involved in running a very simple program and early programmers of the past. Programmers today normally use high-level macro instructions and libraries of pre-assembled code. A single statement in these high-level languages often produces the equivalent of dozens to even pages full of assembly instructions compared to the few we'll be examining here. |
NOTE: If you're using an Anti-Virus program, set to run in the background, be aware that eicar.com should "set-off" an alarm when you access the file. That's what it's supposed to do. Once you're sure that it is *not* a real virus (your AV program should tell you that it's the eicar test program), then you can either set it to exclude eicar.com or disable your AV program for the remainder of this session. If your AV program doesn't alert you immediately (when you either create or extract eicar.com from the .zip archive), then it's most likely set to do manual scanning only; scan the file (as you would any other program you download) to see if your AV alerts you!
Unfortunately, if your only computer is on a LAN at a school, triggering the
AV-alarm might cause you a problem! If it doesn't, and/or your AV program is
disabled or only does manual scans, then executing EICAR.COM should print out
the following when run in a DOS-box:
EICAR-STANDARD-ANTIVIRUS-TEST-FILE!
Even if you can't run the program at all (say you're using a workstation
in a Library for example), you could still learn something by viewing the
pics and reading the information presented here.
Download the file now
(with a brief text description of the program) from The Starman's Realm: Eicar.zip
. Or, create it yourself by pasting the following
characters into Notepad and saving the file with a .com
extension (or change it later; some text editors will always change a file's
extension to .txt, so you might get a filename like 'eicar.com.txt' and need
to change it anyway).
The eicar.com program:
| Warning: Using the W (write) command in DEBUG can result in loss of data on your hard drive! Do NOT experiment with this command. For more information, see Guide to DEBUG. |
Place the file eicar.com into some folder (for example, I'm using C:\TEMP) and note its location. If you've never used a DOS-window before, you should read my page How to Use a DOS Window; others may wish to skim its contents for new information. I've also compiled a list of the DOS 7 Internal Commands here, but the only two you might need to use are the cd (Change Directory) command ( to get to the folder where you stored eicar.com) and the exit command ( to end your DOS session). DOS-windows usually open at the C:\WINDOWS folder.
|
Open a DOS-window
(sometimes called a "Command Prompt") at this time. |
Once you've got the DOS prompt at the folder
where you saved eicar.com, load the program into DEBUG by entering:
debug eicar.com
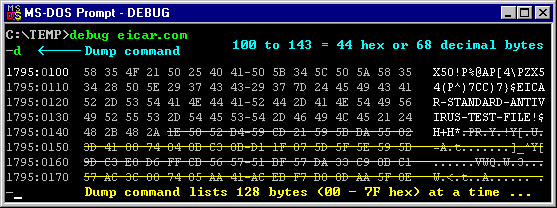
(See green text in the pic below.) The only thing you'll see is a little
dash [-] on the next line. This is the "command prompt" for
DEBUG. Enter the letter d or D (case doesn't matter in DEBUG)
and you should see a display similar to the one below. For each d command
you enter, only 128 bytes are displayed at a time. But our program is just 68
bytes long, so you can ignore all the rest (under the yellow lines). Each line
contains 16 bytes of code or data. [ All numbers displayed in DEBUG are hexadecimal.
( For a detailed study, see: What
Is 'Hexadecimal'?) ]

The two numbers separated by a colon (:) at the
beginning of each line tell you where the first byte of that line is located
in your computer's memory. The first number is called the Segment and
the second is the Offset. [ For a detailed study see: Removing
the Mystery from the SEGMENT:OFFSET Addressing scheme.]
In the pic above, we see
that EICAR.COM was placed into memory beginning at a segment
:offset location of 1795:0100. It's highly unlikely that
your computer will load the program into the same segment of memory (1795),
but the offset (0100) will be the same. DEBUG always
loads .COM files so the first byte of the program has an offset of 0100 hex.
[ The first 256 bytes (00h to FFh) of
the segment contain information that DOS uses to run the
program (that section is called the PSP - Program Segment Prefix.) ]

(Program Instruction Step
1):
Now enter the letter r or R and
you should see a display of your CPU's 16-bit registers similar to
the pic below. The numbers at the beginning of the last line
are always the segment :offset location of the x86 machine
instruction which is ready for execution. As we step through this program,
the offset will always equal the value in the IP register ( Instruction
Pointer). For all true .COM files (size must be less than 64kb), the CX
register will always contain the length of the program unless the code
changes it. Here CX = 44 hex = 68 decimal bytes.

Following the segment:offset (1795:0100) pair
in the last line is the hex number 58 — this is the first byte of the
program's code. It is then decoded as the assembly
language instruction " POP AX " which means to take the last two
bytes of the Stack (stored at offset FFFE and FFFF ) and move them
into the AX register. [ My experience has taught me that
DOS always 'zeroes-out' the last two bytes of a segment used by .COM
programs ( the SP always being set to FFFE ), so executing POP AX
should still leave us with zero in the AX register. The
Stack Pointer will, of course, be changed to 0000 in the
process. Under normal circumstances, however, I would never
consider this to be an example of good programming practice and
would recommend using an XOR AX,AX instruction to zero-out
the AX register. ] (Instruction Step 2):
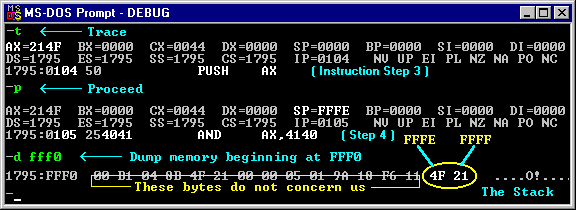
Enter a 't' (for Trace) at the DEBUG
prompt to carry out the POP instruction. This will also display any register
changes and decode the next instruction ( at

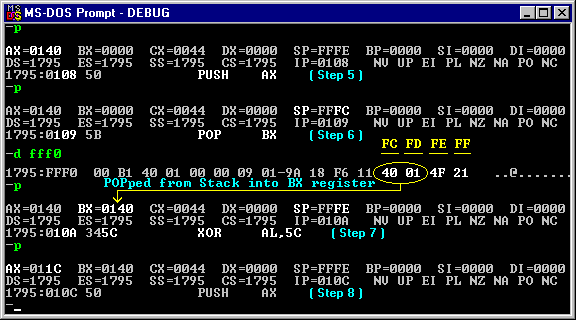
  AX=011C  BX=0140  CX=0044  DX=0000  SP=FFFC
  DS=1795  ES=1795  SS=1795  CS=1795  IP=010D
  1795:010D 5A            POP     DX

  AX=011C  BX=0140  CX=0044  DX=011C  SP=FFFE
  DS=1795  ES=1795  SS=1795  CS=1795  IP=010E
  1795:010E 58            POP     AX
                                               |   2    1    4    F
                                               | 0010 0001 0100 1111  XOR
  AX=214F  BX=0140  CX=0044  DX=011C  SP=0000  | 0010 1000 0011 0100 (2834)
  DS=1795  ES=1795  SS=1795  CS=1795  IP=010F  | -------------------   =
  1795:010F 353428        XOR     AX,2834      | 0000 1001 0111 1011
                                               |   0    9    7    B
[ The table to the right of the XOR instruction
above gives the equivalents of 214F and 2834 in
Binary providing a bit-level graphic display of this logical
function. ]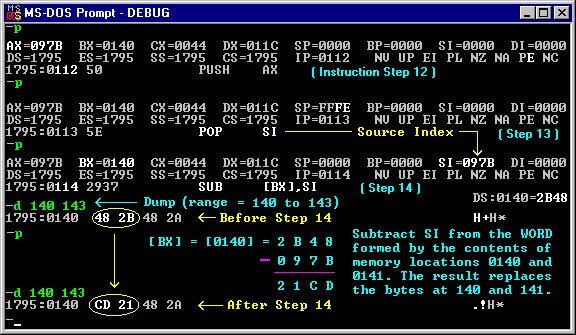
 -r   <-- To see the registers again...
 AX=097B  BX=0140  CX=0044  DX=011C  SP=0000  BP=0000  SI=097B  DI=0000
 DS=1795  ES=1795  SS=1795  CS=1795  IP=0116   NV UP EI PL NZ AC PO NC
 1795:0116 43            INC     BX     [Step 15]
 -p

 AX=097B  BX=0141  CX=0044  DX=011C  SP=0000  BP=0000  SI=097B  DI=0000
 DS=1795  ES=1795  SS=1795  CS=1795  IP=0117   NV UP EI PL NZ NA PE NC
 1795:0117 43            INC     BX     [Step 16]
 -p
(Instruction Steps 17 and 18):
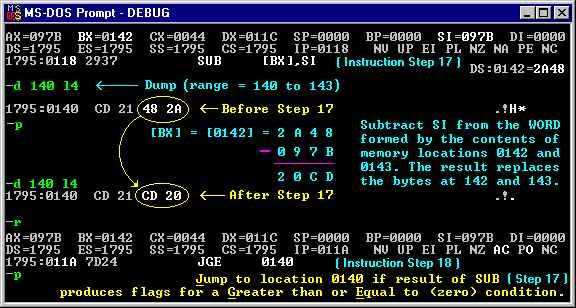
-d 11c 13f
:0110                                      45 49 43 41               EICA
:0120  52 2D 53 54 41 4E 44 41-52 44 2D 41 4E 54 49 56   R-STANDARD-ANTIV
:0130  49 52 55 53 2D 54 45 53-54 2D 46 49 4C 45 21 24   IRUS-TEST-FILE!$
So why did the programmer use JGE 0140 (7D 24) instead of an un-conditional jump instruction? Simply because a short JMP instruction here would begin with the byte EB (decimal=235) which is again beyond the upper limit set for the program's characters. Since there are no conditions which keep execution from making this jump, JGE is an acceptable substitution here.
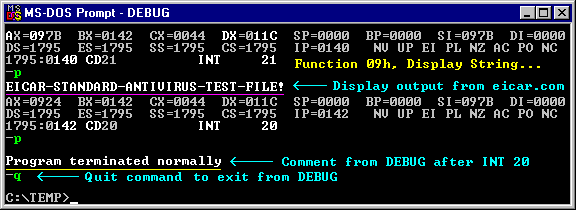
 xxxx:0100 58            POP     AX
 xxxx:0101 354F21        XOR     AX,214F
 xxxx:0104 50            PUSH    AX
 xxxx:0105 254041        AND     AX,4140
 xxxx:0108 50            PUSH    AX
 xxxx:0109 5B            POP     BX       ;--> Places 0140 in BX

 xxxx:010A 345C          XOR     AL,5C
 xxxx:010C 50            PUSH    AX
 xxxx:010D 5A            POP     DX       ;--> Places 011C in DX

 xxxx:010E 58            POP     AX
 xxxx:010F 353428        XOR     AX,2834
 xxxx:0112 50            PUSH    AX
 xxxx:0113 5E            POP     SI
 xxxx:0114 2937          SUB     [BX],SI  ;--> changes bytes at 140-141

 xxxx:0116 43            INC     BX
 xxxx:0117 43            INC     BX
 xxxx:0118 2937          SUB     [BX],SI  ;--> changes bytes at 142-143

 xxxx:011A 7D24          JGE     0140     ;--> Jumps over data string to
                                             ; the last two instructions

 xxxx:011C  45 49 43 41 52 2D 53 54 41  EICAR-STA
 xxxx:0125  4E 44 41 52 44 2D 41 4E 54  NDARD-ANT        DATA  STRING
 xxxx:012E  49 56 49 52 55 53 2D 54 45  IVIRUS-TE     which is displayed
 xxxx:0137  53 54 2D 46 49 4C 45 21 24  ST-FILE!$       by the program.


 xxxx:0140 CD21          INT     21       ;--> DOS Function 09h:
                                             ; Displays the text.
 xxxx:0142 CD20          INT     20       ;--> Program Termination funct.